

A VPN at home or in the office can always be useful, allowing you to connect to your personal network remotely from anywhere securely, better if your VPN is for free and without a public IP.
There are multiple solutions available for this purpose. The basic principle remains the same for all: you need any device to install the VPN Server application, which should be located in the place you want to connect to remotely (e.g., home or office) and must be reachable via a public IP address. Whether the IP is static or dynamic doesn’t matter; it just needs to be public.
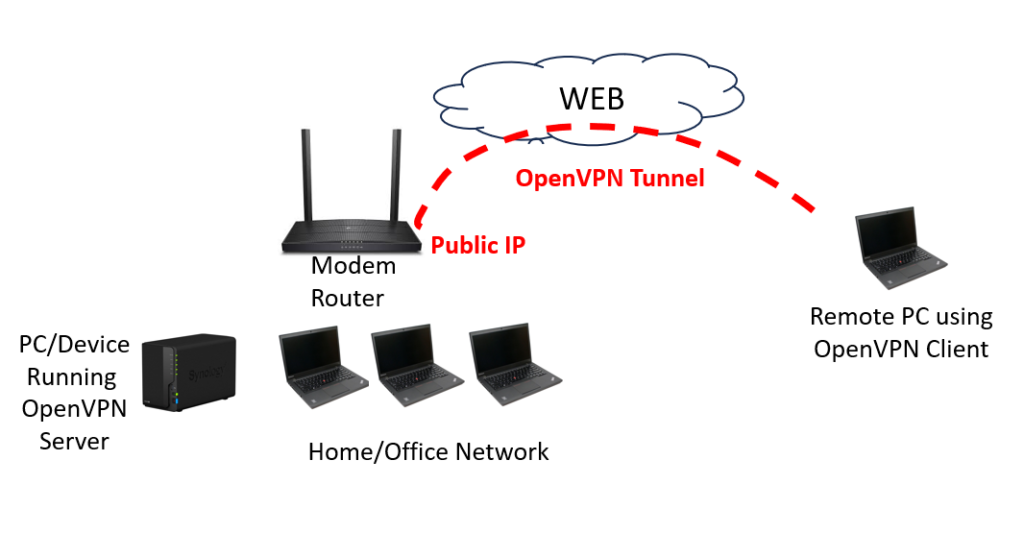
Unfortunately, this is not always possible because very often internet service providers provide a NATed IP address, which means it’s not directly reachable. What you need is a free VPN without the need for a public IP.
In this article, we will see how to make your home or office network reachable via a VPN, or connect to the home server via SSH. We will consider two situations: in the first case, the server you connect to is a Raspberry Pi, while in the second example, it’s a Synology server. In both cases, these are machines based on the Linux operating system, so the examples can be easily extended to any Linux server.
PAGEKITE TO MAKE YOUR SERVER VISIBLE ON THE INTERNET
The solution I propose to bypass the issue of NATed IP and thus have a completely free VPN without a public IP is to use PageKite. It’s an application written in Python that runs on the server you want to make visible. Another application runs on a server with a public address. The two applications connect together, creating what’s called a tunnel.
Let’s see step by step how to proceed.
Creating a PageKite account
Go to the page pagekite.net and create an account. Choose a “kitename” that will identify you from now on to be reachable wherever you are connected, for example, yourname.pagekite.me
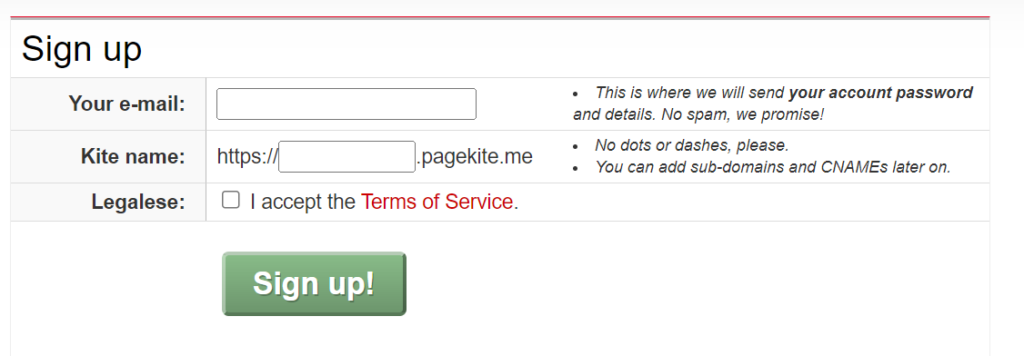
You will receive an email to confirm the account creation, with a password that I recommend changing upon your first connection.
Installation of Pagekite
Now, connect to the machine that will act as the server. I strongly recommend using one with a Linux operating system. A Raspberry Pi will work fine, or if you already have a Synology server, you can use it for this purpose as well. Make sure you have Python installed.
Start by downloading pagekite.py, which is the Python application that will allow you to create a tunnel with a public server. You can use the command:
curl -O https://pagekite.net/pk/pagekite.py
Once you have saved it on your server, you’re in good shape because most of the work is done.
Execute the file.
python pagekite.py --signupAt the prompt -> Name this kite, put the name with which you registered, removing the “pagekite.me” part.
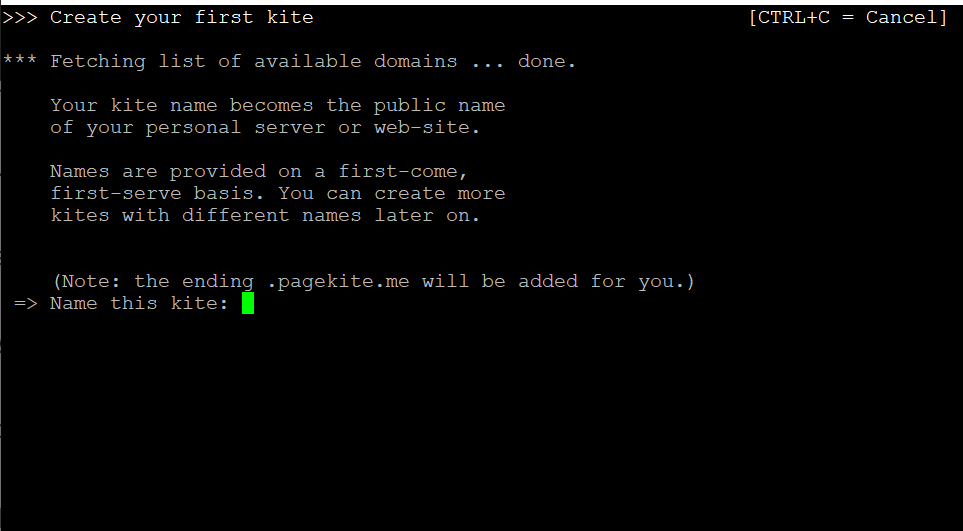
The system recognizes that the name has already been registered and asks for the password that you need to input.
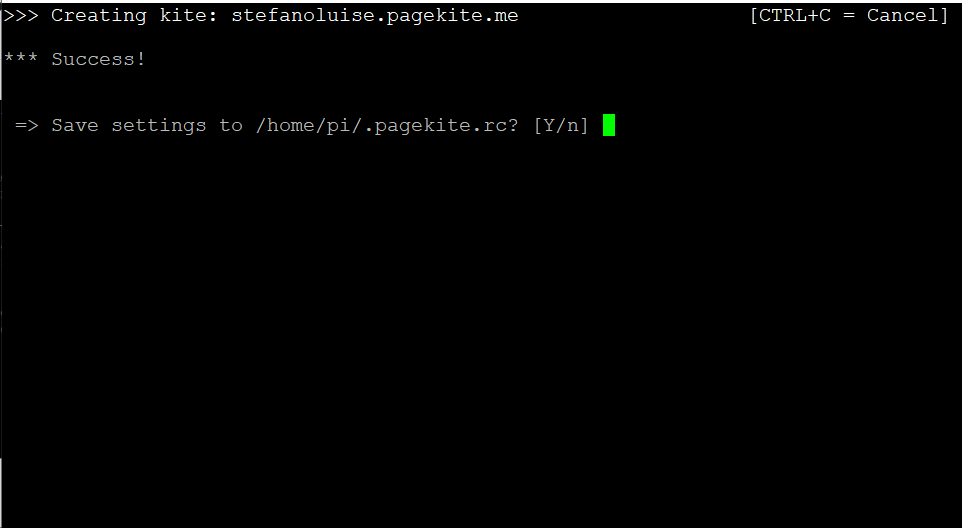
Finally, confirm the saving of the settings in the .pagekite.rc file
The installation is complete. If it’s not already running, execute the program pagekite.py with the command:
python pagekite.py
That’s it. If you open a browser from any internet-connected device and try to connect to the page https://yourname.pagekite.me, you will be directed to port 80 of the machine where you installed PageKite. Unfortunately, unless you have a web server installed, you won’t notice anything because no page will open.
Before installing the VPN server, let’s see how to set up an SSH connection.
SSH Connection
It’s possible to use the tunnel you just created to reach the server via SSH.
Open the .pagekite.rc file located in the HOME directory on the server where you installed pagekite.py and modify this line as follows:
service_on=raw/22:@kitename:localhost:22:@kitesecret
Run pagekite.py:
python pagekite.py
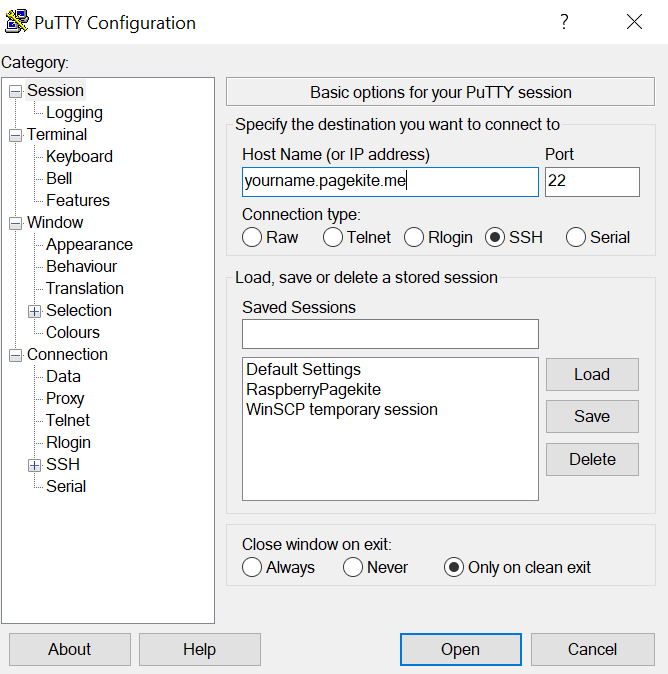
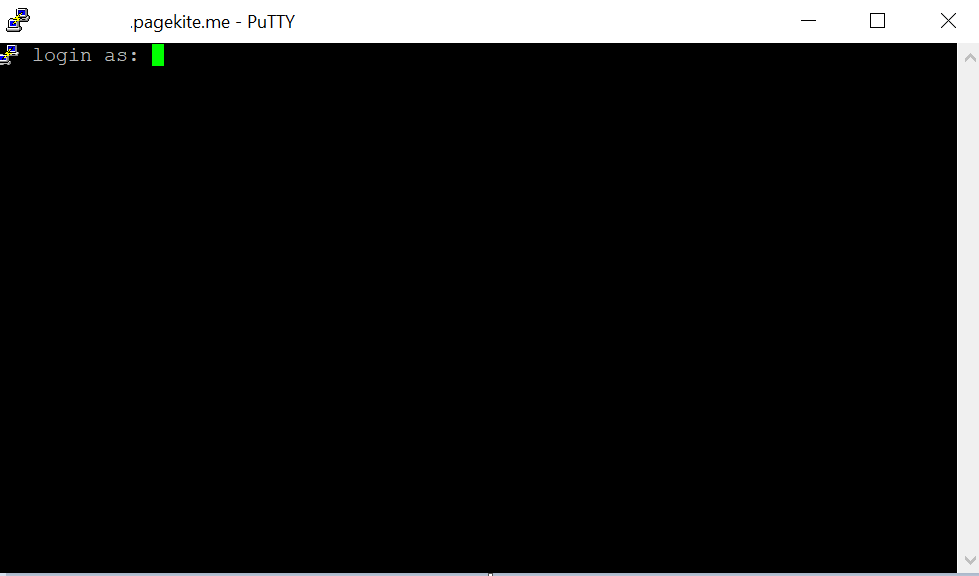
At this point, PageKite has opened the tunnel, which can now be used for the SSH connection (via HTTP proxy). To test, proceed as follows:
Install PuTTY on the PC you will use to connect to the server and set up the proxy as follows:
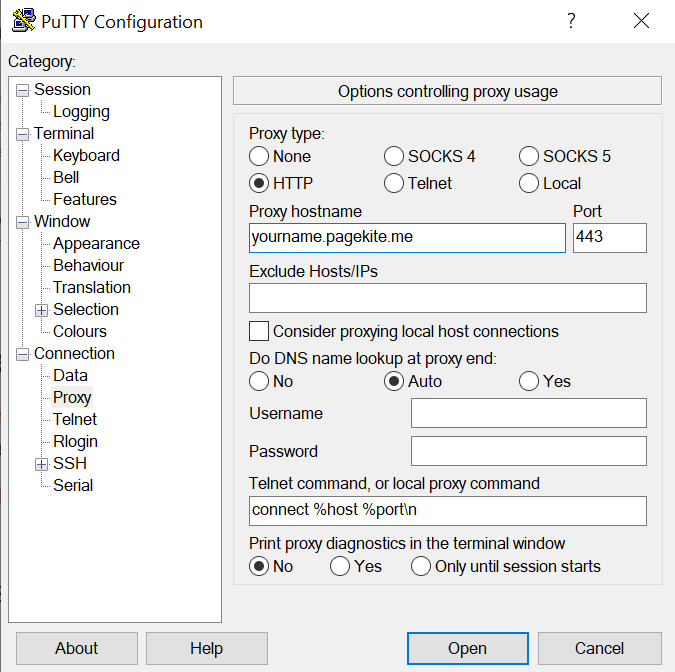
So, connect to the address yourname.pagekite.me
If everything has worked correctly, the login window will open:
Official instructions are available on this page: Pagekite – Tunneling SSH over PageKite – (b74ddbe836e3a)
Installation of piVPN on Raspberry
Let’s move on to the installation of the VPN server. As a first example, suppose you are using a Raspberry Pi as the server. For the installation of the VPN server, give the following command from a shell:
curl -L https://install.pivpn.io | bash
This will start the installation of piVPN, an excellent VPN server that also supports the OpenVPN protocol. Continue with the installation procedure. At some point, it will ask whether we have a static or reserved DHCP address.
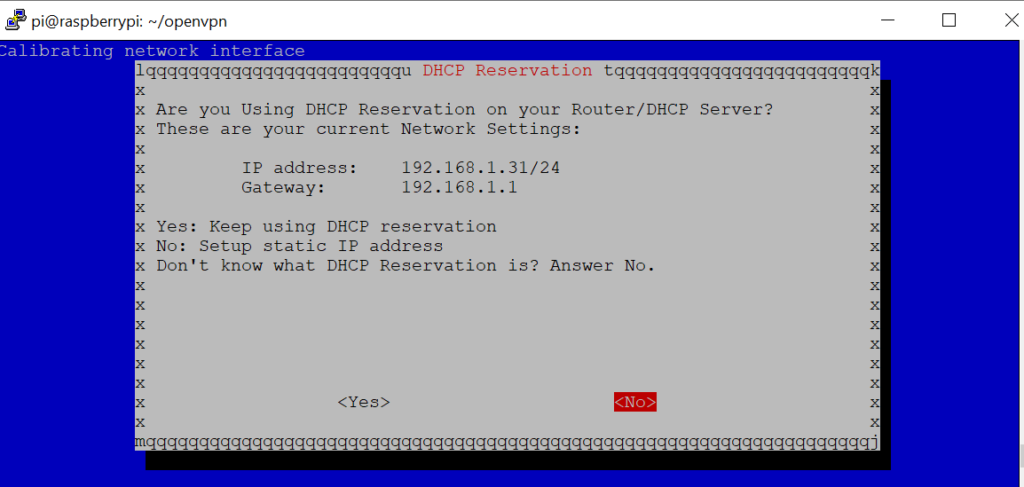
Select your case. I have reserved an address through DHCP.
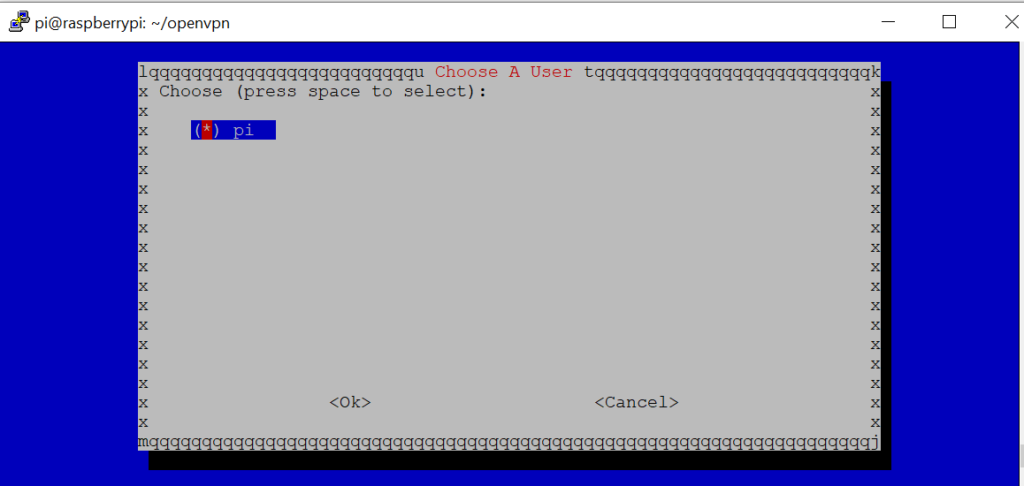
Select the user, in my case, pi.
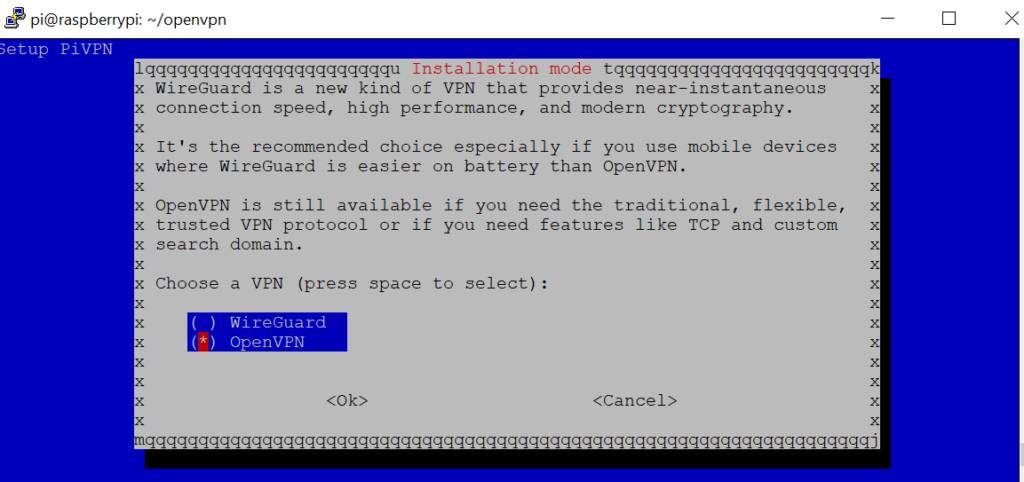
In the next step, select OpenVPN
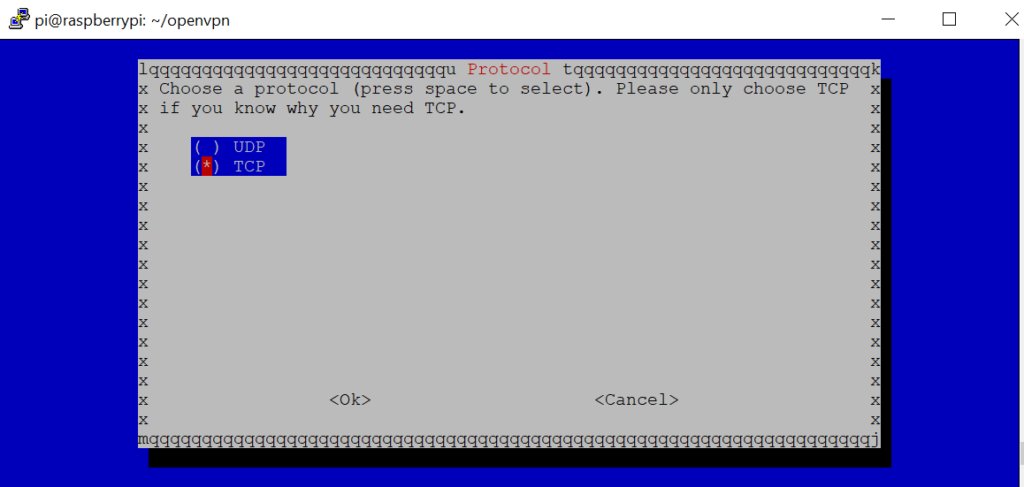
In the next step, press YES, and then select the TCP protocol.
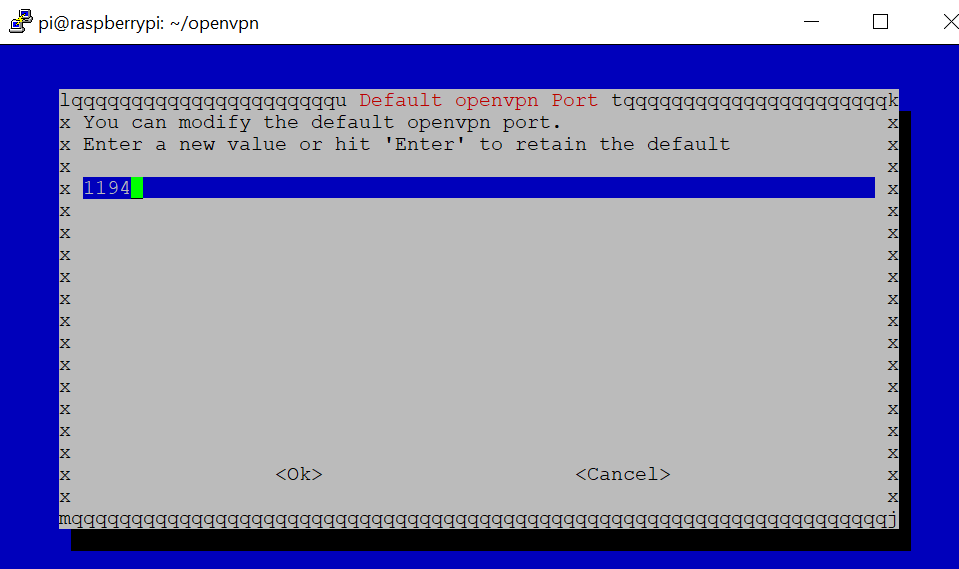
Set the port to 1194
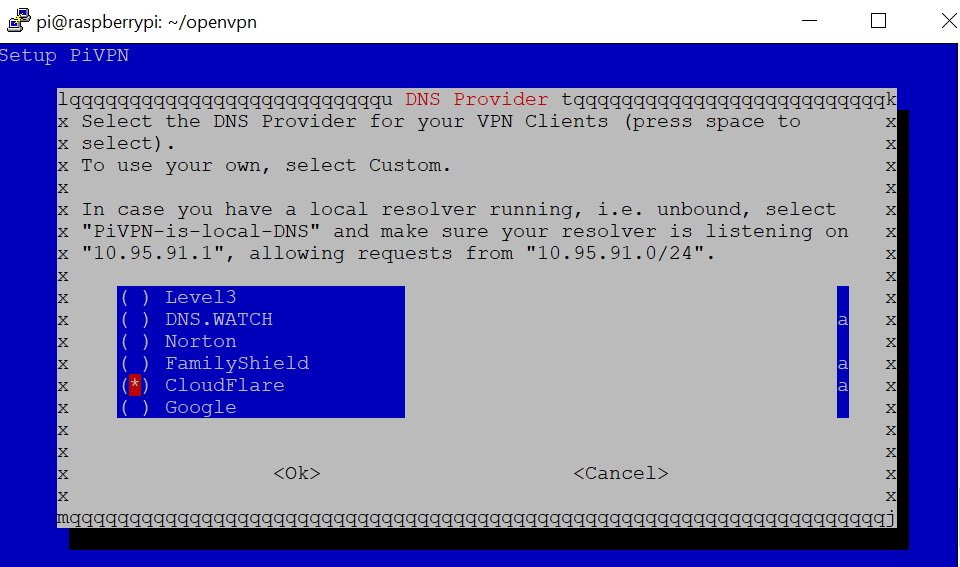
In the next step, select CloudFlare for the DNS
Select NO for the Custom Search Domain.
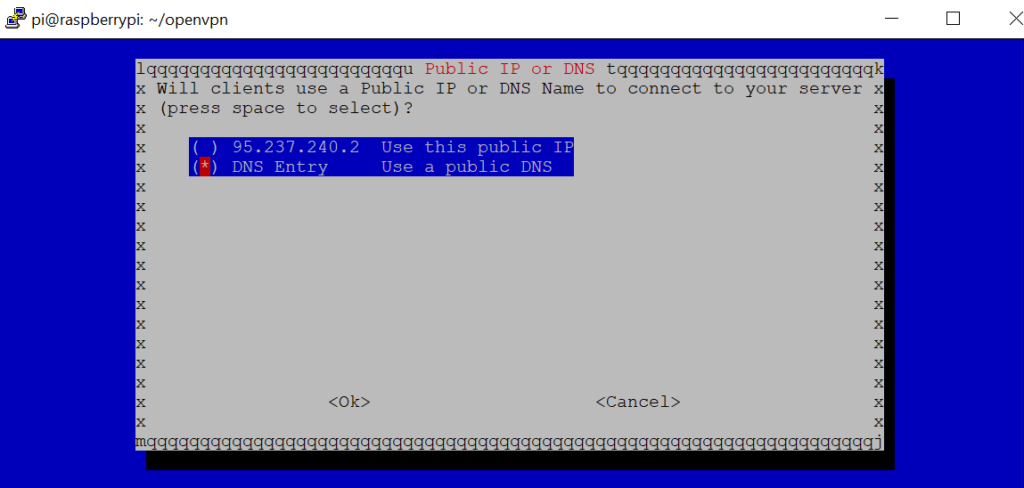
Then select DNS Entry.
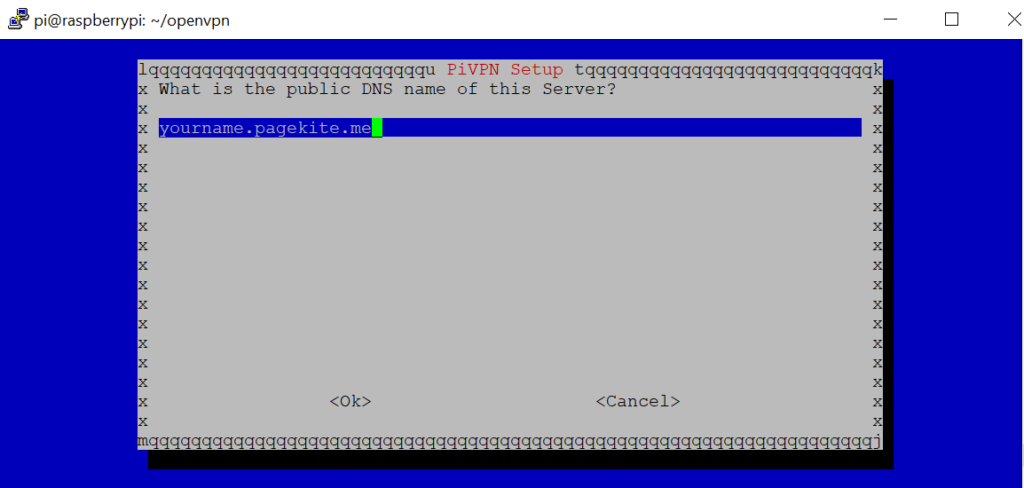
Write your kitename pagekite
Confirm at the next screen.
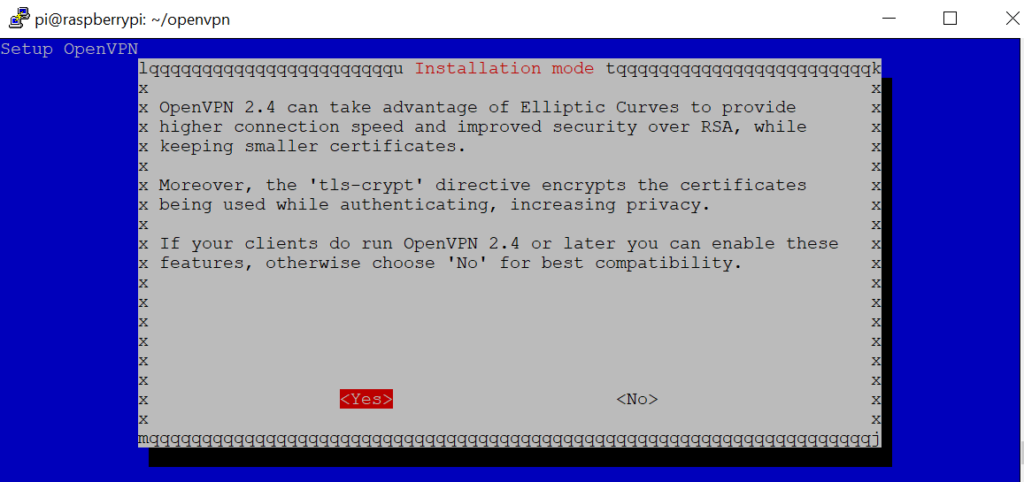
Press yes at the Installation Mode screen
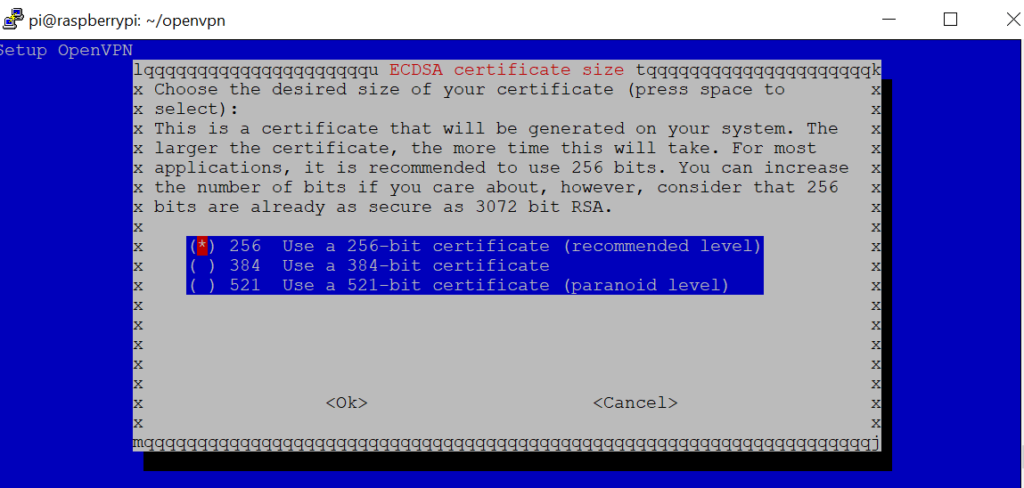
Set the encryption to 256-bit
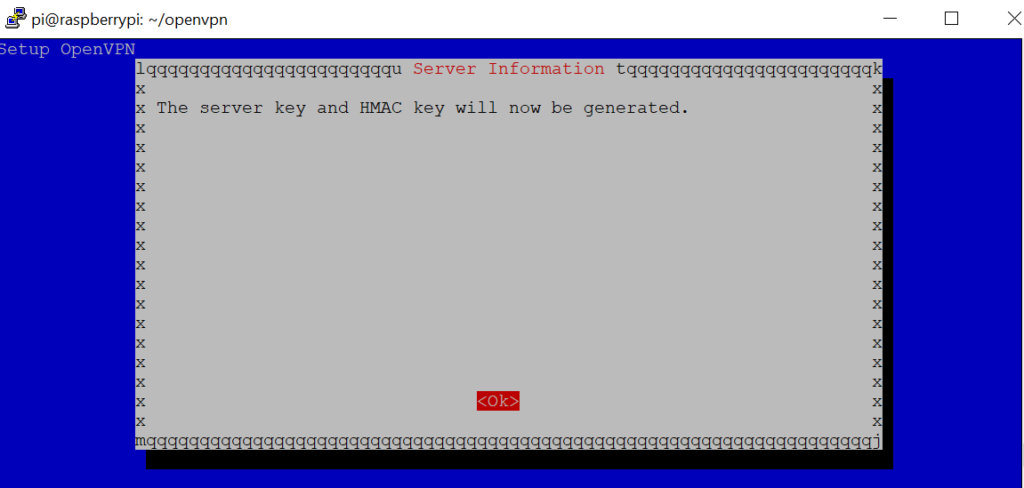
Press OK at the next message
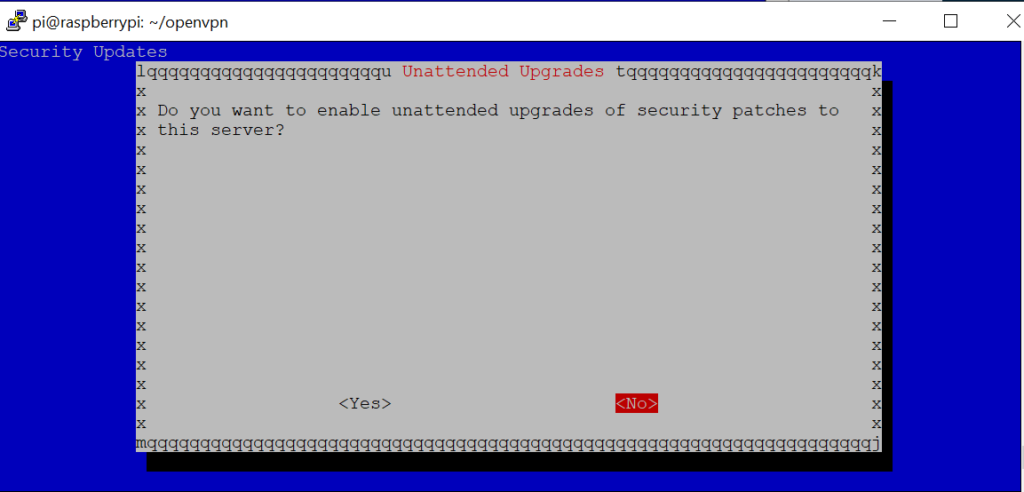
Press OK at the message about Unattended Upgrades, and then select NO
At the end of the installation, accept to restart the Raspberry Pi.
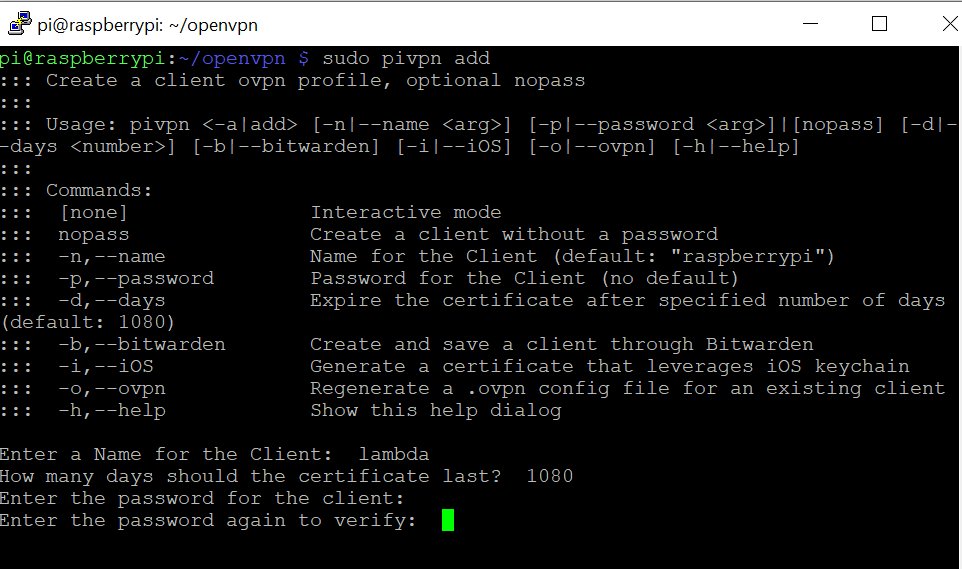
Now, you need to create the profile for the user who will connect to this network remotely. From a shell, give the command:
sudo pivpn add
Set the username and password:
The certificate and keys will now be created :
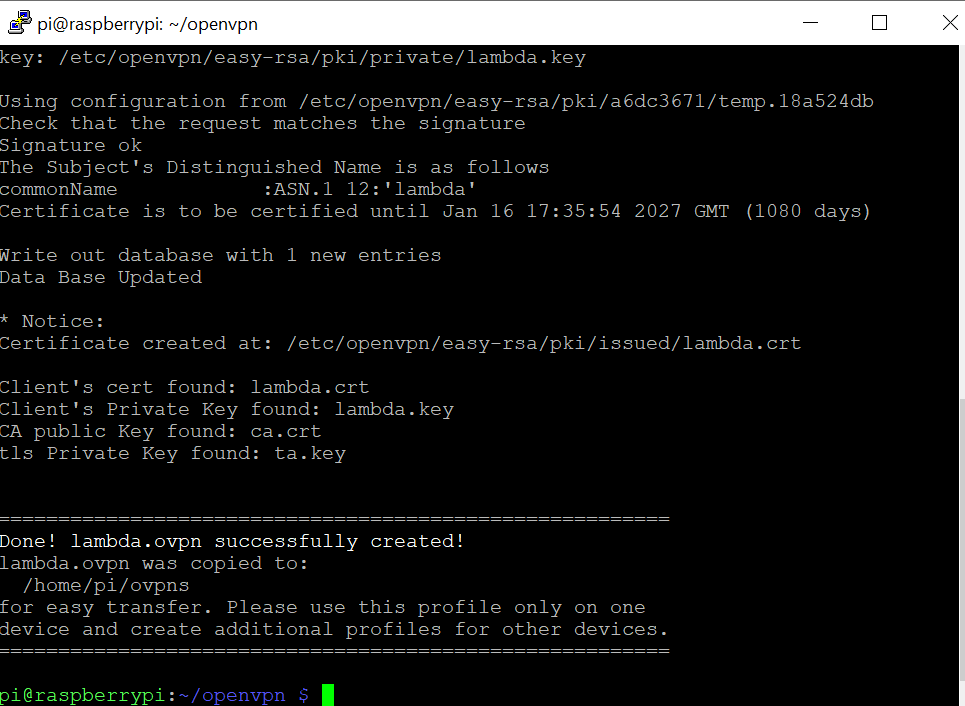
In the folder /home/pi/ovpns, you will find a file named lambda.ovpn or the name you assigned to the user. You need to retrieve this file, for example, by connecting to the Raspberry via FTP, and make a correction. You need to insert or correct the following lines:
proto tcp remote yourname.pagekite.me 1194 http-proxy yourname.pagekite.me 443
Save this file because you will need it shortly. Go back to the Raspberry and modify the .pagekite.rc file located in HOME as follows:
service_on=raw/1194:@kitename:localhost:1194:@kitesecret
Finally run pagekite:
python3 pagekite.py
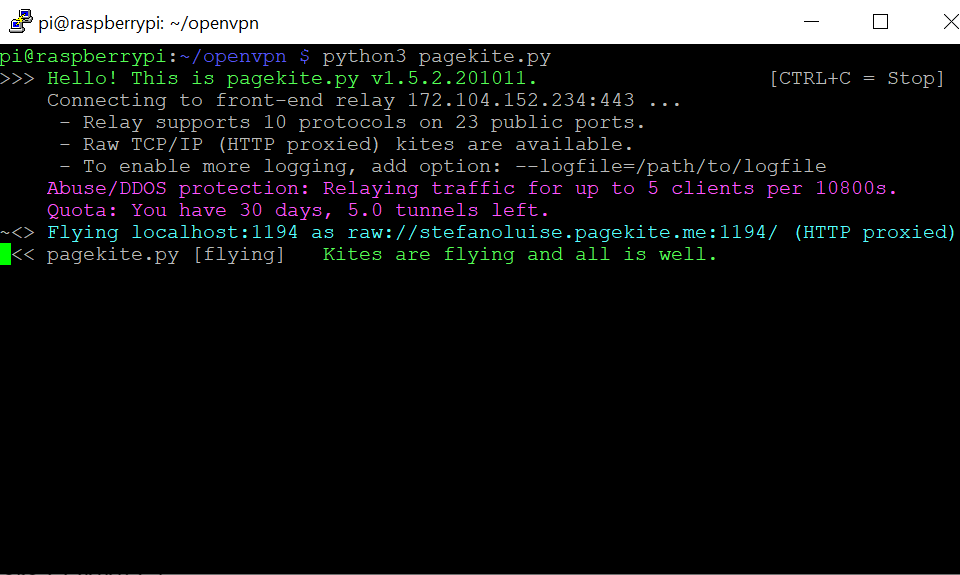
It’s done! The tunnel to your server is open on port 1194, and the VPN Server is running. Now, all you need to do is connect using an OpenVPN client.
Reference link: Pagekite – OpenVPN Over PageKite – (b74ddbe836e3a)
OPEN VPN Client
Download OpenVPN Connect (Client) from the official page OpenVPN Connect – VPN For Your Operating System | OpenVPN and install it on your PC
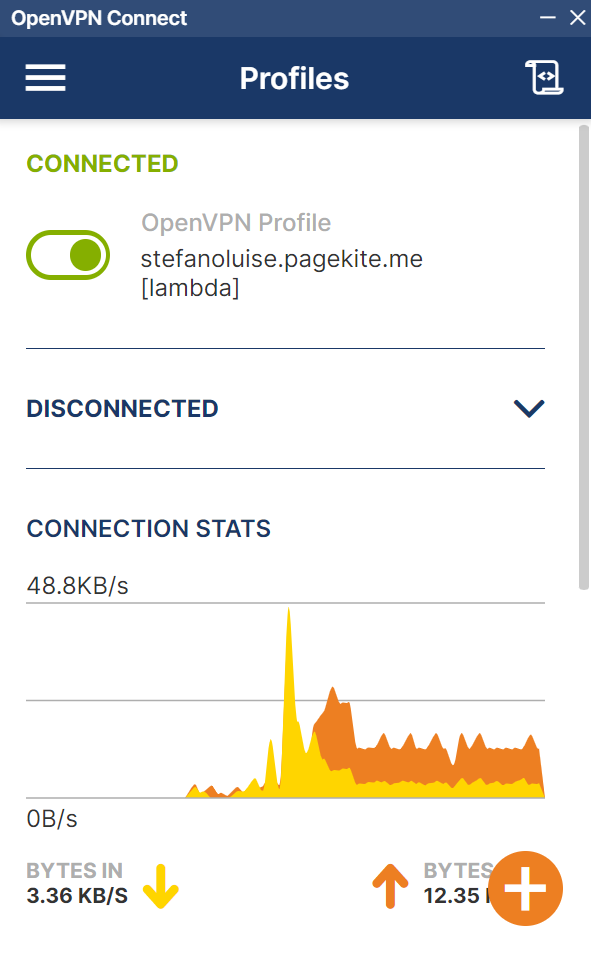
Open OpenVPN client and create a new profile.
Select UPLOAD FILE.
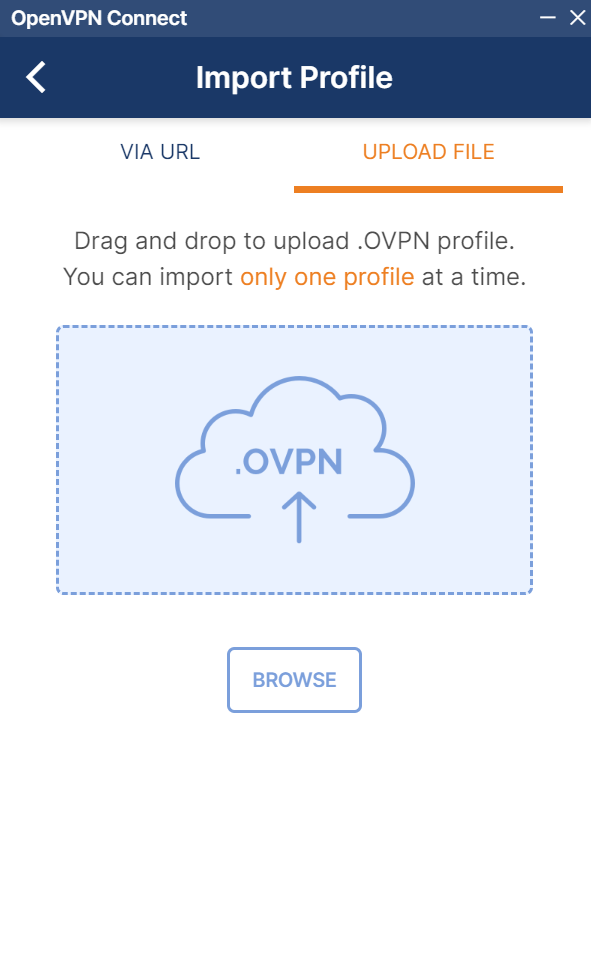
Then, click on Browse and select the lambda.ovpn file that you modified according to the previous instructions.
Click on CONNECT.
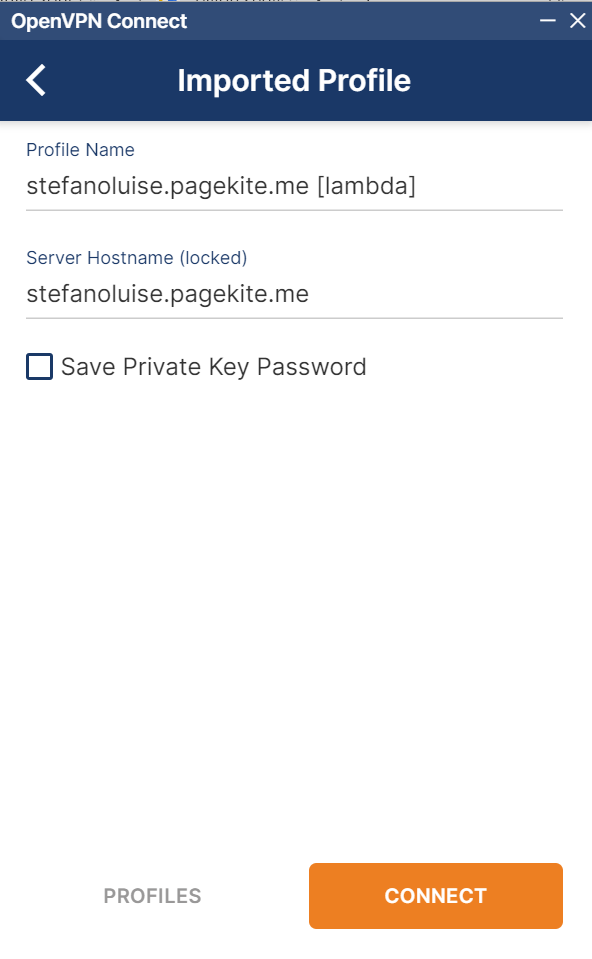
Then, enter the password you set earlier.
You are now connected to your Raspberry via VPN, without a public IP, and completely free.
If you ever need it, note down the command to uninstall piVPN:
sudo pivpn uninstall
OPEN VPN ON SYNOLOGY
Let’s now look at a second example: using OpenVPN on Synology.
First, install the VPN Server package from Package Center on your Synology server.
Install Python as well
Open the VPNServer application and select OpenVPN. Then, check the box for Enable OpenVPN server
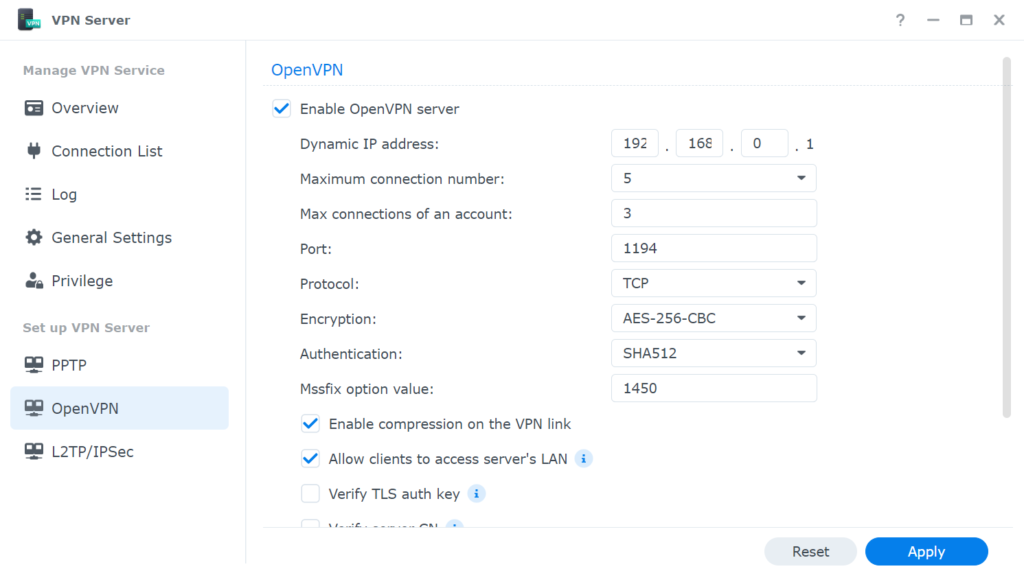
Press the Export Configuration button.
Save the .zip file, from which you will extract the VPNConfig.ovpn configuration file. To this file, add the following lines:
remote yourname.pagekite.me 1194 http-proxy yourname.pagekite.me 443
Then, save it for later use.
Pagekite on Synology
Open a shell and connect via SSH to your Synology server. Follow the instructions in the previous section to install PageKite if you haven’t already done so.
Open the .pagekite.rc file and modify this line as follows:
service_on = raw/1194:yourname.pagekite.me : localhost:1194 : @kitesecret
Replace ‘yourname’ with the name you registered on PageKite.
You can make PageKite run automatically when the Synology server starts up by creating a file called launcher.sh and copying the following text inside:
#!/bin/sh /var/services/homes/name/pagekite.py
WARNING: You should insert the full path where the pagekite.py file is located.
Then, go to Control Panel and select Task Scheduler.

Create a new task by selecting Create -> Triggered task -> User-defined script.
Then, under General -> Event, choose Boot-up to ensure that the task runs upon startup.
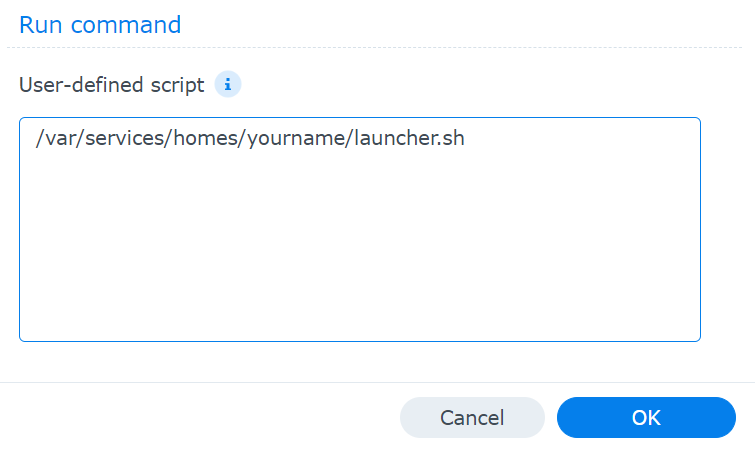
Next, under Task Settings -> Run Command, paste the path of the .sh file you created.
Connection with the server and creation of the VPN
Install OpenVPN client on your PC and follow the instructions provided in this section.
Select the .ovpn file that you exported and modified earlier.
Now, by pressing CONNECT, you should be able to connect to your Synology server. You have created a VPN, free and without having a public IP.
OTHER INTERESTING ARTICLES
Mars Rover – Raspberry innovative project (lambdaprogetti.it)
FOOD FESTIVAL ORDERING AND MANAGEMENT SYSTEM (lambdaprogetti.it)
A free step counter (no-frills) app: NDEMO 10K (lambdaprogetti.it)