
It’s called Cashdesk, and it was developed as a tool to support the management of local festivals, particularly the cash handling at food stands. This food festival ordering system is a completely innovative solution compared to those available online, which are mostly reliant on software installations on PCs.
All the software is housed in a small single-board computer, the Raspberry Pi. This hardware comes at an extremely low cost, and the software is written in PHP and Python, making it portable to any platform with a web server. In principle, it can be installed on any PC with a Linux operating system.
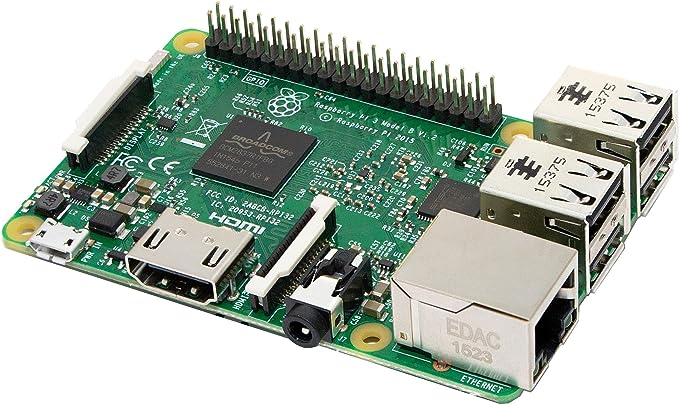
The Raspberry solution proves to be the most convenient and immediate, as it only requires copying the system image to a Raspberry SD card to have everything up and running, already configured in just a few seconds.
Operating principle of food festival ordering system
The following figure illustrates the general connection and operation diagram of the food festival ordering system with Raspberry Pi.
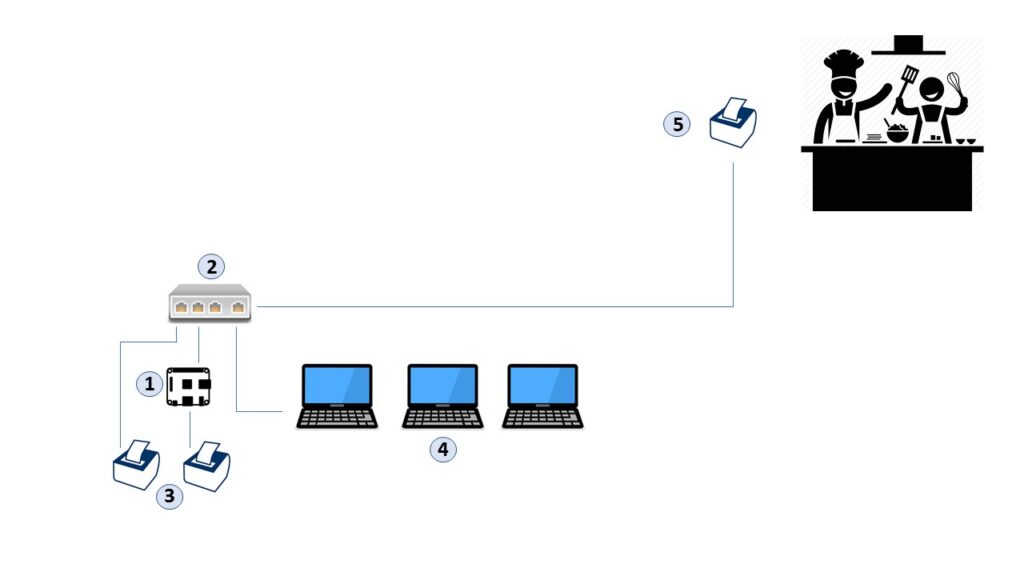
- The system comprises a Raspberry Pi or a PC with WebServer and CashDesk software functionality;
- A switch/hub for connecting PCs/Raspberry/Printers;
- One or more cash printers connected to the WebServer via USB or network,
- One or more PCs in the cash area serving as operator stations. The WebServer can also function as an operator station; simply connect a monitor, keyboard, and mouse to it.
- Additionally, there is a printer in the kitchen connected via the network due to the distance from the cash stations and the Raspberry Pi.
The general operating principle is quite straightforward. Cash operators receive customer orders entered into the system through a web interface. The number of cash operators is unlimited, as any device with a web browser connected to the network can access the main page of the WebServer. No dedicated software installation is required on the cash workstations; a common browser such as Internet Explorer, Firefox, Opera, Chrome, etc., is sufficient. Once the order details are entered, a receipt is generated in the cash printer, and a copy is sent to the kitchen printer. At this point, the customer can sit and relax, awaiting their order to be processed in the kitchen. Their number will be called when the requested dishes are ready.
Installation on a Raspberry Pi board
Installation of Cashdesk in a Raspberry PI is the preferred and highly recommended mode for the simplest and most immediate use of the software.
Requirements:
- Raspberry Pi board; the latest version is not strictly necessary, and you can opt for a more economical older version, as the program does not require particularly high performance.
- Micro SD memory card of at least 8GB.
- Printers for printing receipts. Refer to the “Printers” section for choice and configuration details.
Installation procedure
- Download the .img file of the Raspbian operating system containing the pre-installed and configured software.
- Copy the image to the micro SD card. You can find a simple and quick guide here (go directly to section 4: Install Raspbian on an SD card and use the downloaded image file from point 1, or the raspberrypi.org website contains numerous guides.
- Insert the SD card into the Raspberry Pi, connect a monitor, keyboard, and mouse, then power on the board. You can start using the application.
Installation on Hardware Other than Raspberry (Optional)
If you have followed the instructions for the Raspberry Pi installation in the previous section, you can skip this part. The following is an alternative way to implement your food festival ordering system.
As mentioned earlier, installation on Raspberry Pi is the most immediate as it doesn’t require laborious software configuration. However, if someone wishes to install it on different hardware, it’s possible. I provide the major steps to follow for now; a more comprehensive guide will be developed in the future:
- Have a PC with a Linux operating system. I have always worked with Debian or its derivatives, but in general, any distribution will work.
- Install Apache2, MySQL, PHP7, and PHPMyAdmin. Also, install Python 2.7 and the Python ESC/POS library with its dependencies.
- In the main user directory (let’s call it /home/User), copy the structure and downloadable files from the repository. This will create the structure /home/User/public_html/cashdesk.
- Configure Apache2 so that the working directory containing the web pages is /home/User/public_html/cashdesk.
- Configure MySQL (MariaDB) with a root user and a user named ‘cashdesksql’ with the password ‘cashdesksql.’
- Use PHPMyAdmin to create the database needed for the program. Simply create a new database called ‘cashdesk’ and then import the tables found in the cashdesk.sql file available in the repository.
- Access the program locally by opening a browser and typing http://localhost. If you’ve done everything correctly, the login page will open. Log in with one of the configured users, for example, ‘user1’ with the password ‘user1,’ and start using the program.
Powering Up the food festival ordering system on Raspberry Pi
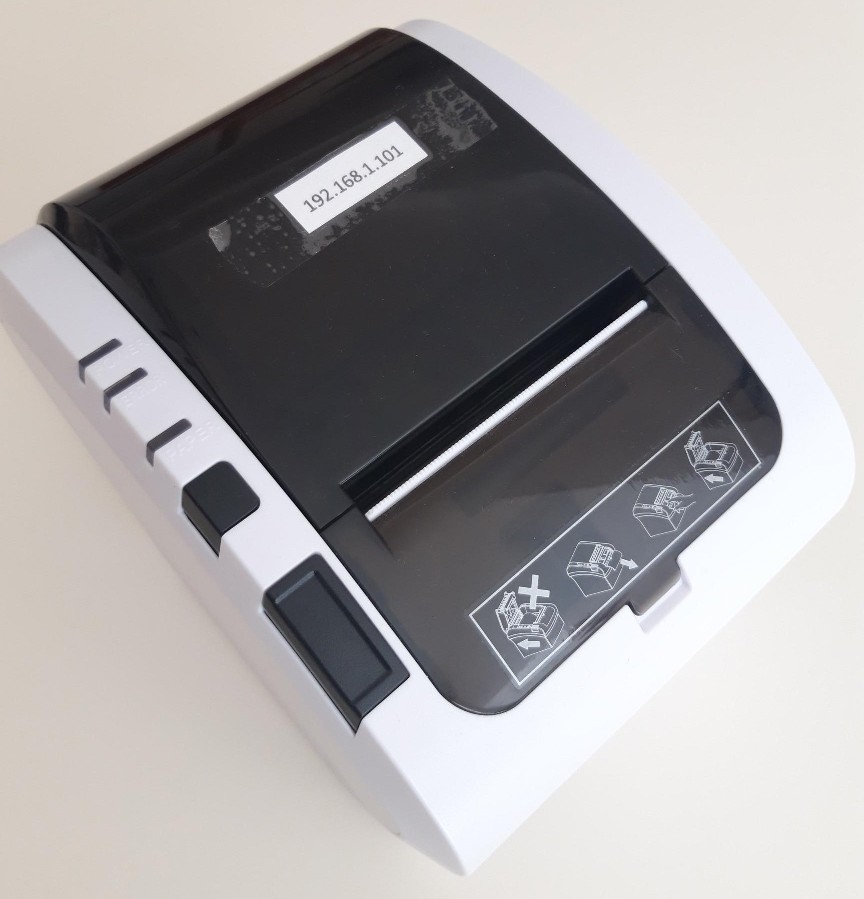
If you have installed the software on the Raspberry Pi by flashing a memory card from the image, insert the memory card into the Raspberry Pi and power it up. The Raspberry Pi will have the pre-set IP address 192.168.1.100. If this falls within the address range of your network, you can leave it as is; otherwise, edit the file /etc/dhcpcd.conf and modify it with the addresses you prefer.
The default users are:
- root with the password cashdesk
- pi with the password cashdesk
The MySQL (MariaDB) database has the user cashdesksql with the password cashdesksql.
To access the program, open the browser on the Raspberry Pi and enter the address http://localhost. If you are connecting from another PC on the same network, enter http://192.168.1.100 or the address you set earlier. This will open the login page. There are three default accounts:
- user1 with the password user1
- user2 with the password user2
- user3 with the password user3
Log in with one of the accounts. Before continuing with the explanation of how the program works, the printers need to be configured; without them, the program won’t function, or rather, it will function but won’t make much sense to use.
Printers for your food festival ordering system
Imagine a typical situation in any food stand, where dozens or hundreds of orders need to be managed within a couple of hours during lunch or dinner. For each order, you need to print a receipt at the cash register to hand to the customer and one in the kitchen. It is evidently inconvenient, both in terms of time and cost, to rely on a laser printer or, worse yet, an inkjet printer. The costs for toner and ink cartridges would be exorbitant, and the printing times would not be compatible with the speed required to quickly handle waiting queues of customers. It is much more cost-effective to use thermal paper printers. However, the software has been designed to handle both types of printers:
- Traditional Printer (laser, inkjet, etc.) installed as the system printer: In this case, printing occurs on A5-sized sheets (an A4 sheet cut in half widthwise).
- Thermal Paper Printer with a width of 56mm or 80mm, connected via USB or network: No driver installation is required; the printers must be ESC/POS compatible (almost all of them are).
Configuration of a Traditional Printer
As mentioned above, the use of inkjet or laser printers for printing receipts is not cost-effective. However, Cashdesk software does not exclude them outright, and if you wish, you can still use them. First, you need to configure them in Raspbian, the Raspberry Pi operating system. Obtain the drivers and follow the manufacturer’s instructions; you should have the printer installed and working. Print a test page for safety and set the paper size to A5. I cannot provide specific instructions because each printer is unique. I suggest using CUPS, the web utility for printer configuration. To access it, open the browser on the Raspberry Pi and enter http://localhost:631, then follow the instructions.
Choosing and Configuring a POS Printer of your food festival ordering system
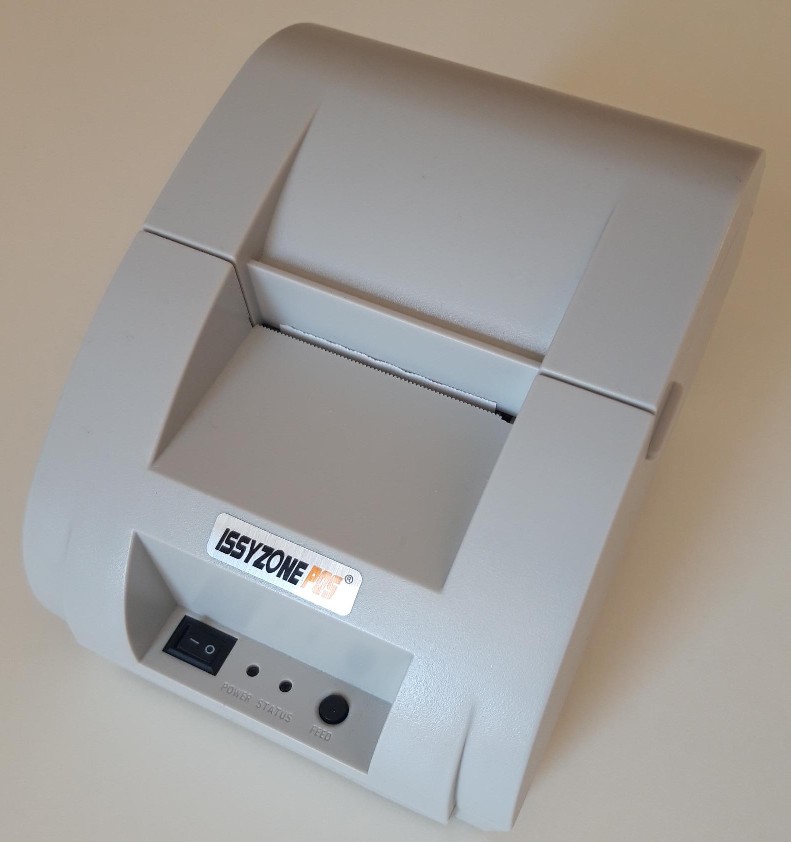
POS printers are specifically designed for printing receipts and invoices. They do not use ink cartridges but instead print on rolls of thermal paper. A 20m long roll of paper costs only a few cents and is sufficient for approximately 200 receipts, making it economically advantageous compared to toner. You can find a wide variety of POS printers online at very affordable prices. The main features to consider are:
- Paper width: Typically 58mm or 80mm.
- Connectivity: USB and/or Ethernet, sometimes wireless. Some printers also support serial connection, but Cashdesk software does not handle it, so it’s advisable to avoid this feature.
- Automatic or manual cutter: An automatic cutter is a useful feature, and Cashdesk manages it for added convenience. Especially for the printer in the kitchen, where during peak hours receipts are generated rapidly, automatic cutting prevents the chaos of manually separating each receipt. Partial cutting has the advantage of keeping them connected while also allowing quick separation.
Regardless of the printer you choose, you MUST ABSOLUTELY verify that it supports the ESC/POS protocol. It’s a protocol developed by Epson specifically for POS printers, and practically all printers of this kind have adapted to it. Make sure that the one you are going to purchase supports this protocol. The cost range starts from just over €20 (including shipping) for a printer like the one in the figure, with manual cutting, 58mm paper width, and USB connection.
At around €70 for the one described below, equipped with USB, Ethernet, automatic cutter, and 80mm paper width.
If you have chosen to use a POS printer with the ESC/POS protocol, you don’t need to worry about downloading and installing any drivers. Data is sent in RAW mode without going through the print spooler (the print buffer) of the operating system. CashDesk will manage the print queue priority in the case of simultaneous requests, ensuring the maximum printing speed. I assure you that you will never achieve the same speed by going through the operating system’s print spooler.
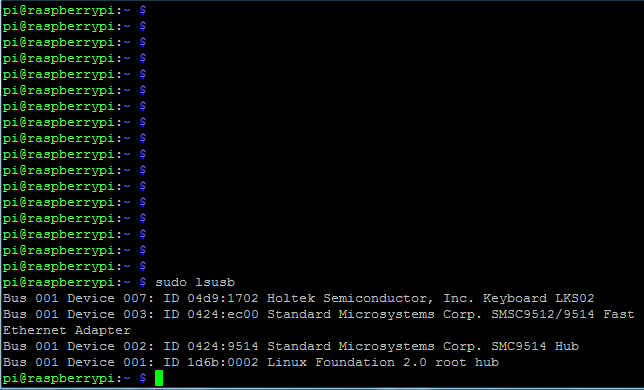
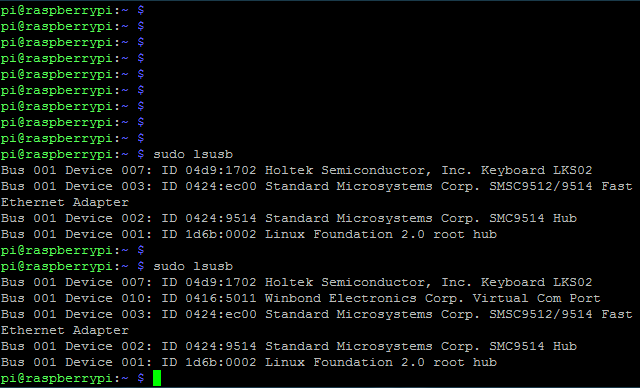
If the printer is connected to the USB port of the Raspberry Pi, and only in this case, the two parameters you need to note down are called Product ID and Vendor ID. Obtaining these two parameters is straightforward; let me explain how.
- First, turn on the printer and connect the USB cable to the printer but do not connect it to the Raspberry Pi yet.
- Open a command shell and type the command
sudo lsusb. You will see a list of all USB devices connected to the Raspberry Pi, such as the mouse, keyboard, etc.
Now, connect the POS printer to the Raspberry Pi’s USB port and run the command sudo lsusb again. What do you notice? An additional line appears, indicating that the printer is now connected. Take note of the two numbers after the label “ID” and separated by a colon. The first one is called Product ID, and the second one is Vendor ID. In the example below, they are 0416 and 5011.
So, in this example, the Product ID is 0416, and the Vendor ID is 5011.
That’s it; nothing else is needed.
If, on the other hand, the POS printer is connected via the network, the process is even simpler. Configure the printer with an IP address within the subnet you are in and your printer for food festival ordering system is ready.
CASHDESK PROGRAM
At this point, you have installed the software on your Raspberry Pi, configured the printers, or at least noted down parameters such as IP address, Product ID, and Vendor ID that you will need later.
The food festival ordering system with Raspberry Pi is currently a web server. To access the CashDesk program, open a browser and enter the IP address of the Raspberry Pi.
From now on, we’ll refer to the station that accesses the program on the Raspberry Pi through the browser (Explorer, Firefox, Opera, Chrome, etc.) as the client or simply the client.
We’ll refer to the Raspberry Pi as the web server.
If you wish, you can use the same Raspberry Pi, the web server, as the client. Open Chrome and type http://localhost in the address bar.
If the client is another PC connected to the same network, open the browser on the PC and access the web server by typing http://192.168.1.100 (or the address you set if you modified the default one).
Login window
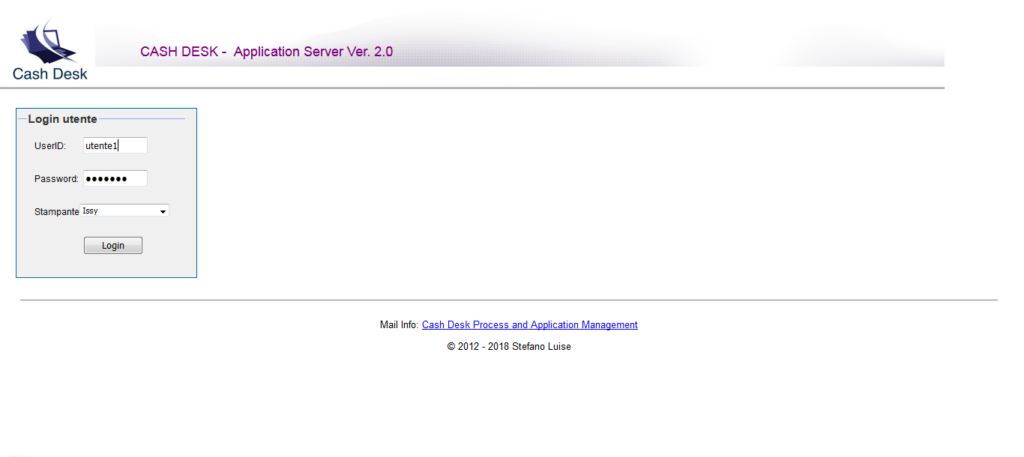
There are three pre-set users named utente1, utente2, and utente3 with passwords equal to their user IDs. In the same window, you can choose the printer on which the connecting user will print the receipts they generate. For the first login, you haven’t set up the printers yet, so leave this selection for now. Press Login to enter.
Main window of Cashdesk food festival ordering system :
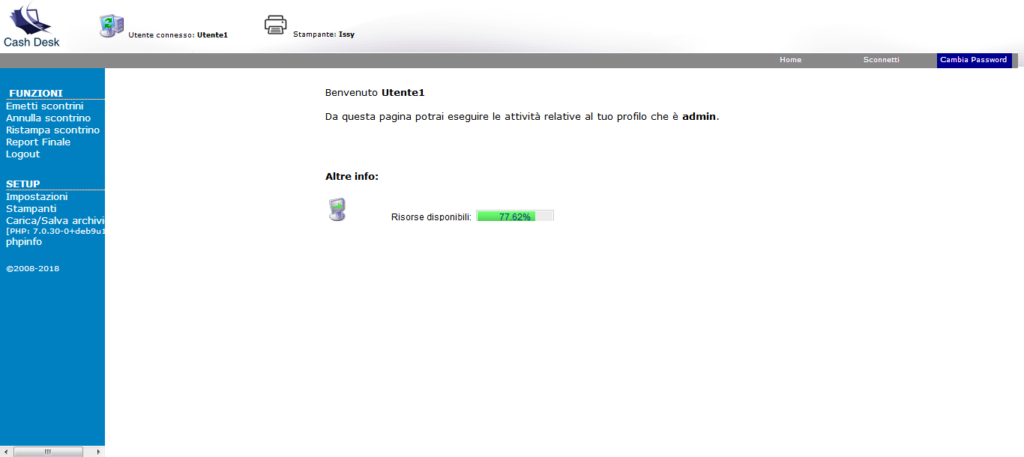
Main Screen Overview:
- At the top, next to the program icon, you can see the name of the logged-in user and the selected printer.
- The gray menu bar with options for Home (return to the main page), Disconnect (log out), and Change Password (to modify the password of the connected user).
- The blue menu on the left, with options divided into two groups: FUNCTIONS and SETUP.
- Finally, in the central part of the screen, the welcome message with the name of the user and the profile. Note that currently, all users have an admin profile. This option has been introduced with the perspective of making different functions available to users with different profiles in the future.
- An obvious but important note: the program users and their admin profiles are entirely separate from the operating system users.
Printers Menu
This menu item, located under the SETUP group, allows you to define the available printers for the cash operators and the one that will be used in the kitchen in your food festival ordering system with Raspberry Pi.
Select the menu item, and a screen similar to the following will appear.
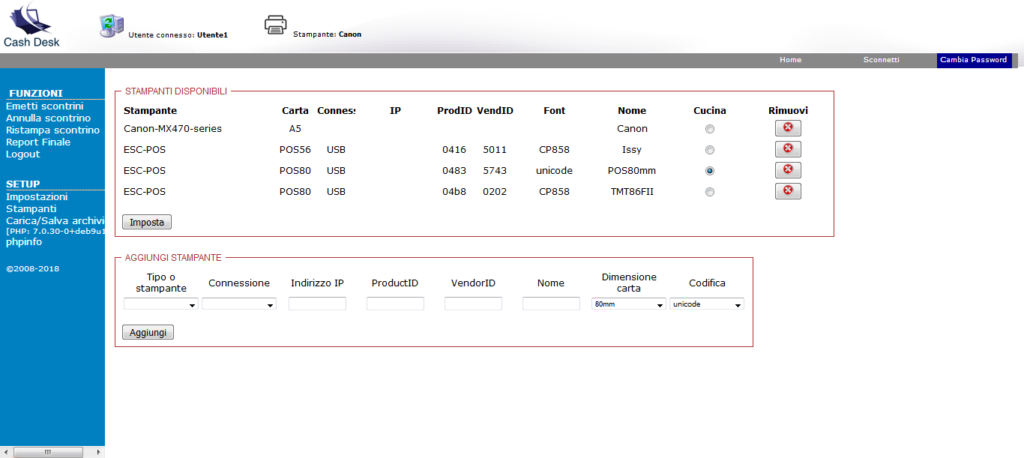
If you have installed the ISO image for Raspberry, default printers are already present, which are most likely not the ones you have. You can safely remove them.
In the AVAILABLE PRINTERS box, click on the “X” under the Remove column to remove the printer.
Adding a Printer
Look at the ADD PRINTER box. In the dropdown menu under the “Type of Printer” column, select ESC-POS if the printer you want to add is an ESC/POS printer, or select one of the traditional printers already configured in the system that should appear in the dropdown menu.
If you select one of the system-installed printers, all other fields will be disabled. The paper size is set to A5 by default, and you just need to give a name to the printer. Press the Add button, and you’re done.
If you want to add an ESC-POS printer to your food festival ordering system with Raspberry Pi, you need to specify the connection type (USB or Ethernet). If you choose Ethernet, you need to provide the IP address of the printer, while if the printer is connected to the USB port of the Raspberry Pi, you need to provide the Product ID and Vendor ID parameters, as explained earlier.
Finally, give the printer a name and choose the paper size. The last parameter is the encoding type, which is used for recognizing accented letters and the euro symbol (€). It varies depending on the printer model. If you don’t know the encoding type, choose one and check if it works.
Proceed in the same way for the other printers you want to add.
Choosing the Kitchen Printer
When you have finished adding the printers, go back to the AVAILABLE PRINTERS box. Under the Kitchen column, select the printer that will be placed in the kitchen and press the Set button.
The printers for the food festival ordering system with Raspberry Pi are finally configured. It’s time to do some print testing.
Issuing Receipts
Before updating the list of dishes, it’s a good idea to check if the printers are working correctly.
First, disconnect from the current session by pressing the Disconnect option in the top menu. Then log in again, but this time select the printer that you will use as the cash register printer for the operator who is currently logging in to the food festival ordering system with Raspberry Pi.
Choose the “Issue Receipts” option in the FUNCTIONS group of the left menu.
Select a quantity different from zero for some dishes listed and press the Print button.
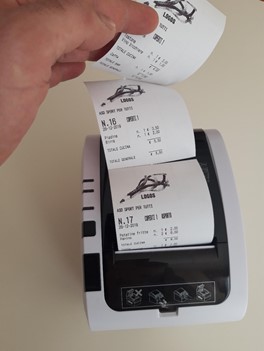
If everything has worked correctly, you should see two receipts printed, first in the cash register printer and then in the kitchen printer. They should be identical and show the same sequential number.
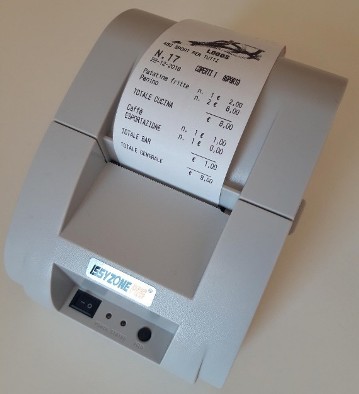
You can also add notes next to each dish, and by checking the Takeaway option, the word “TAKEAWAY” will appear on the receipt.
By filling in the Amount Received field in the receipt issuance confirmation window, the change to give to the customer will also be displayed.
If the print was successful, it means that the printers have been installed correctly, and you are already in good shape in configuring your food festival ordering system with Raspberry Pi. You can move on to the next section for updating the list of dishes and other setups.
Setup of food festival ordering system
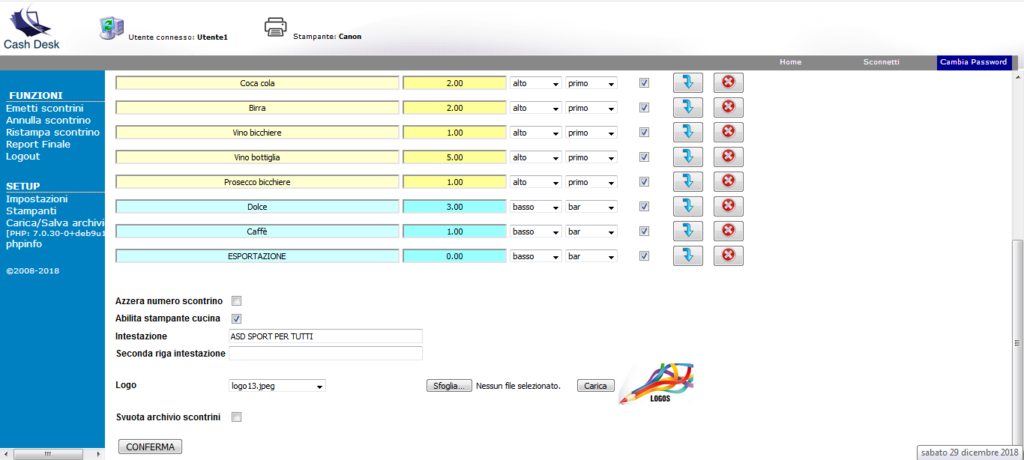
By selecting the Settings option in the SETUP group on the main menu, you will have access to the following page.
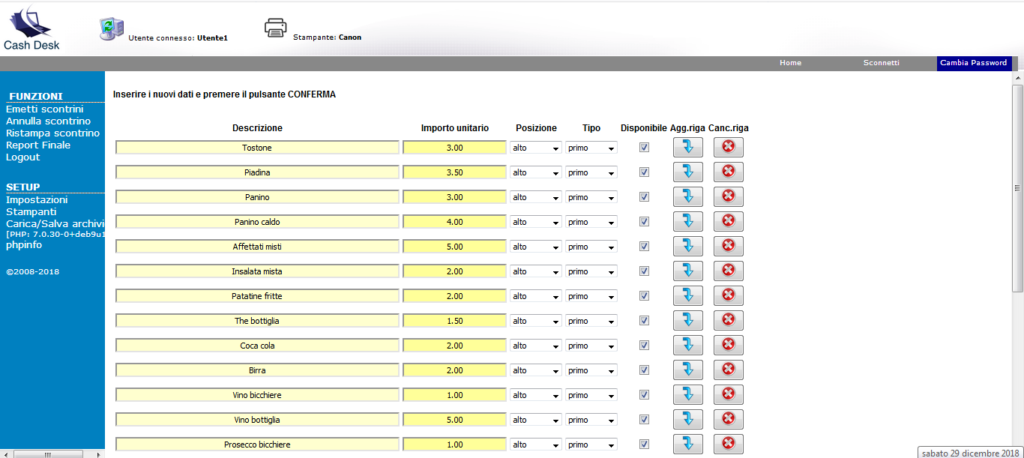
The top part of this section allows you to add or remove available dishes. To remove a dish, press the button with the cross, while to insert it, position yourself on the row below which to insert the new dish and press the button with the blue arrow.
The meaning of the fields Description and Amount is obvious, while the Position field can take the values High or Low. If a dish has the Position field set to High, it will appear in the first subtotal; if it is set to Low, it will appear in the second subtotal of the receipt. This division is useful, for example, if the kitchen and the bar are separate. Note that if a receipt contains ONLY dishes that are in the Low position (i.e., BAR), it will only come out in the cash register, as it does not contain dishes that the kitchen can prepare.
Let’s make an example to clarify: If a person orders only a coffee, the receipt comes out only at the cash register because it is assumed that the single coffee is prepared not by the kitchen but by the bar. The customer goes to the bar area with the receipt and gets the coffee.
If this distinction is not useful for you and you are fine with all receipts being printed in both the bar and the kitchen, then leave the Position field set to High for all dishes.
The Type column allows you to define the type of dish (first course, second course, side dish, …) and has only statistical purposes that you will find in the final reports.
Finally, uncheck the box in the Available column if you want the dish to appear in the list but be disabled and therefore not orderable. This is useful, for example, if a dish is finished but you do not want to remove it from the list because it could become available again soon.
After updating the menu of dishes in the cash management at village festival system, let’s move on to the bottom part of the Settings.
Check the box for “Reset receipt number” if you want the receipts to start from 1 again.
If, for some reason, you want to disable the printing of receipts from the kitchen printer (for example, to run tests or because one printer is sufficient in your organization or for any other reason), then uncheck the box next to “Enable kitchen printer.”
Write any text you want to appear below the logo in the “Header” field.
Now let’s move on to defining the logo to use in your food festival ordering system with Raspberry Pi. The drop-down menu shows the names of the logos already in the /home/pi/public_html/cashdesk/logos directory. If this is the first time you are using the program, you will only see the pre-loaded examples. Press the “Browse…” button, select the image file you want to use as the logo from your storage, then press the “Upload” button. Go back to the drop-down menu, and at this point, the file will appear in the list. Select it and press the “CONFIRM” button. You should now see it small next to the “Upload” button.
Menu Load/Save Archive of food festival ordering system
This feature, found in the SETUP group, allows you to save the menu of dishes with their prices and other set parameters for your cash management at village festival system. It is useful for saving the data of an event and reloading them the next time the same event occurs, without having to rewrite the entire menu each time. Give it a name and press the “Save” button.
Once the archive is saved, it is available among those selectable in the drop-down menu to be reloaded when needed.

Cancellation Function
By selecting the “Cancel receipt” option in the FUNCTIONS group of the main menu, you can access a screen where, by entering the number of an already issued receipt, you can send a message to the kitchen to cancel the request.
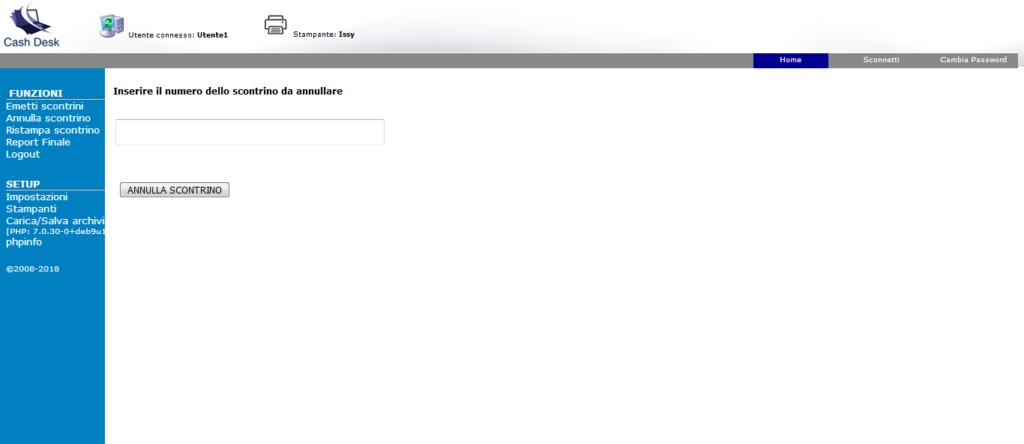
The receipt will also be marked as “canceled” in the database and, as a result, not counted among the statistics of dishes sold.

Receipt Reprint Function
It may be useful to reprint a receipt, for example, if the paper has run out or if there has been some issue that prevented the normal printing process.
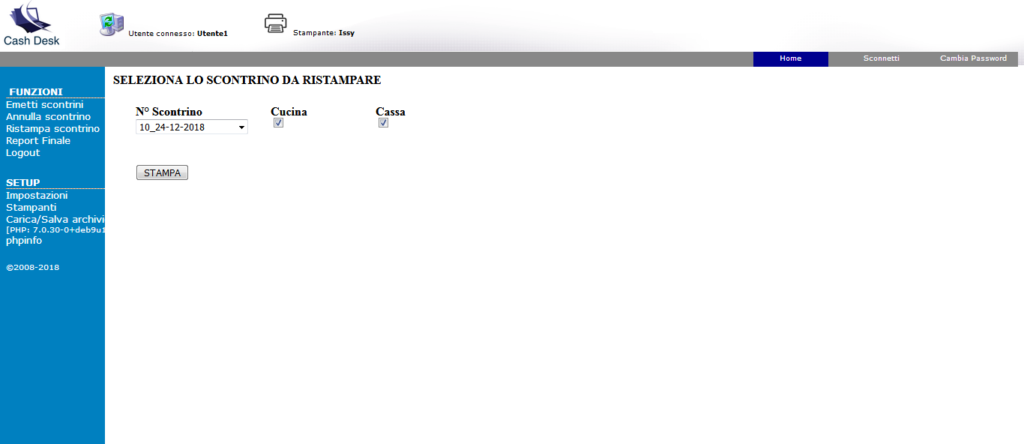
Select the receipt you want to reprint from the drop-down menu and check the printer through which it should be printed.
WARNING: Receipts for POS printers are saved in the format nn_dd-mm-yyyy where nn is the receipt number, dd is the day, mm is the month, and yyyy is the year. For example, 10_24.12.2018 is receipt number 12 issued on 24/12/2018.
On the other hand, receipts generated for system printers (inkjet, laser, etc.) are standard PDFs and are saved with names formatted like scontrinoNN_A5.pdf, where NN is the receipt number.
Press the “Print” button, and the selected receipt will be reprinted on the chosen printer or printers.
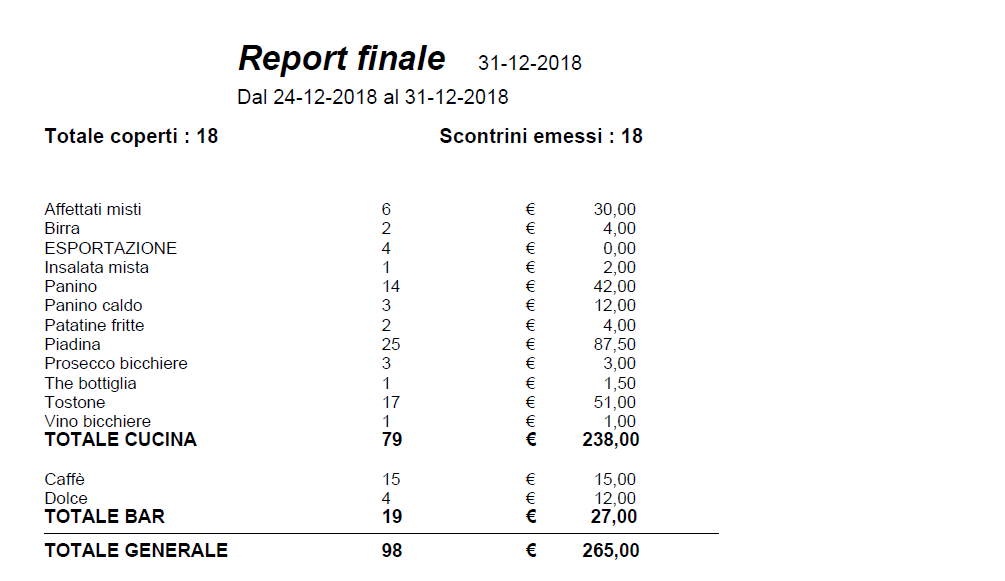
Final Report for cash management at food festival ordering system
By selecting “Final Report” from the main menu in the FUNCTIONS group, you will obtain the following screen.
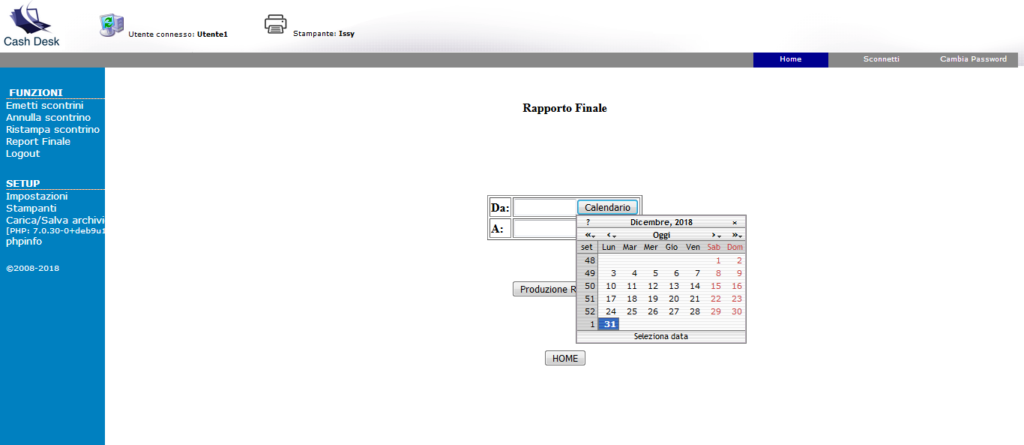
Set the start and end dates, then press the “Generate Report” button. A PDF file will be created containing information on the number of covers, dishes produced, revenue, etc.
Useful Information
If you install the CashDesk cash management at village festival system by copying the ISO image to a micro SD memory card for use in a Raspberry Pi, you will have a series of default settings summarized below for convenience.
Default Raspberry Accounts
Linux OS Users
User: root – Password: cashdesk
User: pi – Password: cashdesk
MySQL Database Users (MariaDB)
User: cashdesksql – Password: cashdesksql
Directories and Files on the Raspberry Pi
/home/pi/Accounts_MySql/datilogin.txt – This file contains accounts for connecting to the database. /home/pi/public_html/cashdesk/ – This directory contains PHP and Python files for the Apache web server. It is set as the main directory of the Apache web server.
/home/pi/public_html/cashdesk/backup/ – This directory contains SQL backup files of the database.
/home/pi/public_html/cashdesk/logos/ – This directory contains logo files.
/home/pi/public_html/cashdesk/scontrini/ – This directory contains receipt files. It needs to be manually cleaned to remove receipts that are no longer needed.
That’s all for your cash management at village festival system !!! Have fun !!!